Mixed reality
Mixed reality section of the XTAL runtime settings menu contains all mixed reality related options (only available for XTAL MR headsets).
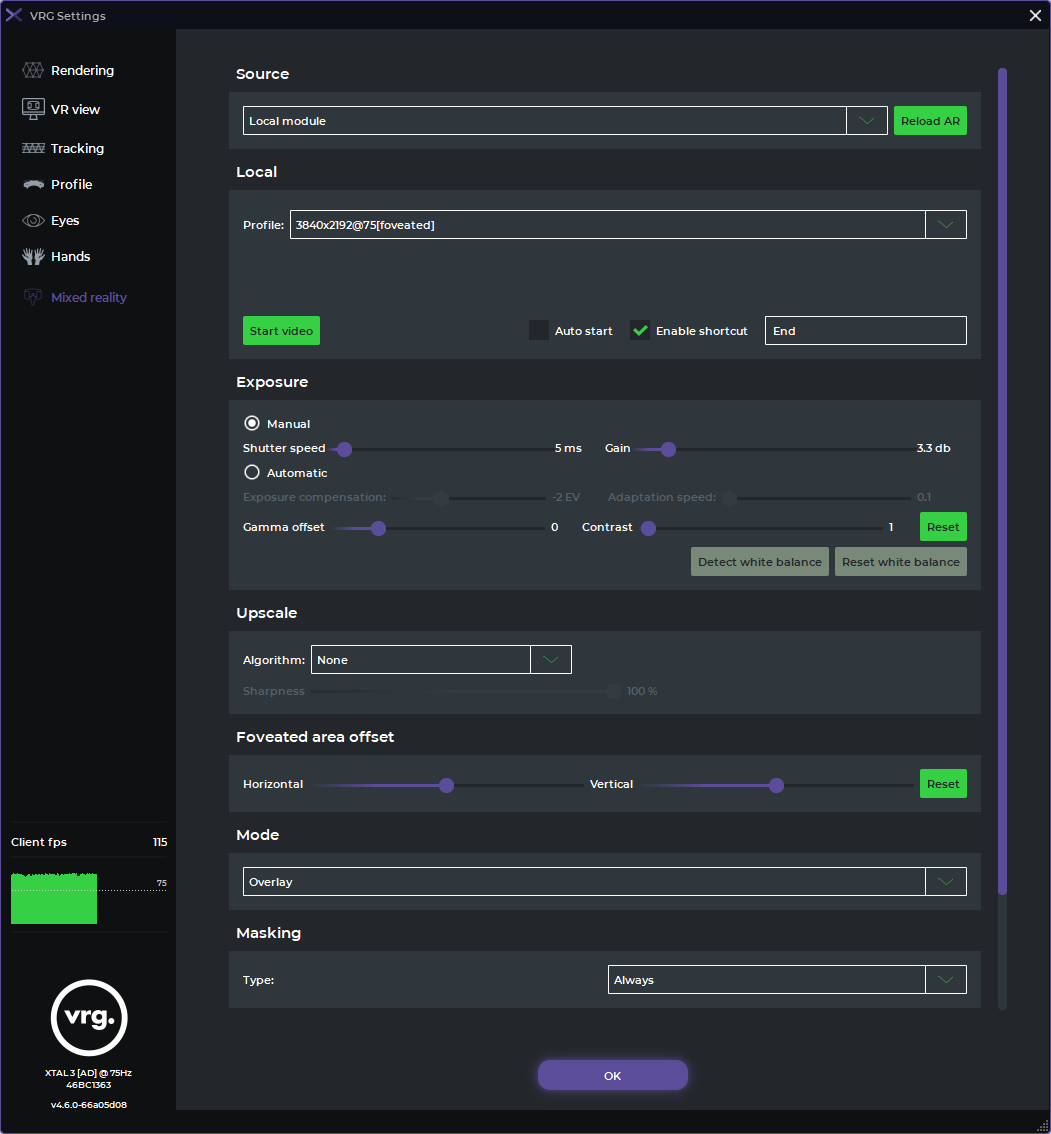
- If you are using the embedded (Local) mixed reality module, you can select the desired resolution and frequency
- If you are using the remote module instead, you can set the connection details (requires separate VRTool streaming application running on the remote PC with connected XTAL remote module)
- Reload AR
- this button can be used to reload the mixed reality module, if there are any issues with the data connection
- Start video
- use this button to enable/disable the visualization of the mixed reality image inside the headset, you can also utilize the predefined keyboard shortcut
- Autostart
- if this checkbox is enabled the mixed reality visualization will be activated automatically when any XTAL compatible application is started
- Exposure
- allows changing the camera exposure settings to achieve best visual quality for the current environment
- some of the options (white balance presets, 2x gain mode) are only available for the XTAL 3 NEO headsets (MR module 3.5.)
- Upscale
- you can select either ‘AMD FidelityFX Super Resolution’, ‘NVIDIA Image Scaling’, or ‘Vrg aSharp’ algorithm
- when this feature is enabled the mixed reality images will use higher upscaled resolution
- additionality you can also enable a ‘Denoise’ algorithm along with the upscaling
- ‘Sharpness’ slider controls the strength of the sharpening pass
- Foveated area offset
- you can change the horizontal and vertical offsets for the foveated part of the mixed reality image
- default values (0,0) correspond to the middle of the mixed reality image
- this only applies when you select one of the ‘foveated’ profiles in the Profile selector
- Mode
- you can select which mode will be used to display the virtual and camera images
- Background – places the camera images behind the virtual, requires using a compatible application with see-through parts of the virtual image (for example Unity vrghmd plugin with the ‘Alpha channel’ option active)
- Overlay – places the camera images in front of the virtual, so they will always be visible, you can also use additional masking options to change how the camera and virtual images will be mixed together
- Cinema – places the camera images in a specified position in the virtual 3D space (relative to the current virtual camera position), in this mode the camera images will not move along with the virtual movement but stay in the same position
- you can select which mode will be used to display the virtual and camera images
- Masking (only available for the Overlay mode)
- Always
- the full MR camera images will be visible (specific size depends on the FOV of the cameras and selected resolution profile)
- Chroma key
- specified chroma key color is used as an alpha channel in the MR camera images, so the virtual image is visible through the parts with that specific color
- you can set the color, saturation, tolerance, and denoise values
- Custom texture
- the MR camera images are masked by a custom texture submitted by the end application along with the main VR texture
- this needs to be supported by the specific application
- Combined
- combination of chroma key and custom texture masking (either as AND or XOR texture combination)
- 3D mesh
- the MR camera images are masked by a 3D mesh placed in the virtual space relative to tracking origin
- you can load any obj or fbx model, and you can set its’ translation, rotation, and scale offsets
- 3D mesh with chroma key
- combination of chroma key and 3D mesh masking
- Always

- Adjustment
- Physical/Virtual position – use this slider to change whether the camera images should be placed in their real physical position or closer to the virtual eye position of the user (this can make the mixed reality depth perception better for some users)
- Latency offset – use this slider to adjust additional preprocessing for camera images to compensate for the camera latency
- Blending – use this slider to change how the edges of the camera images are blended into their virtual surroundings
- Latency enable – use this checkbox to completely disable latency compensation (not recommended for standard usage)
This page was last modified on February 6th, 2024 at 17:10
< PreviousNext >